Step-by-Step Guide to the Solar Panel Installation Process
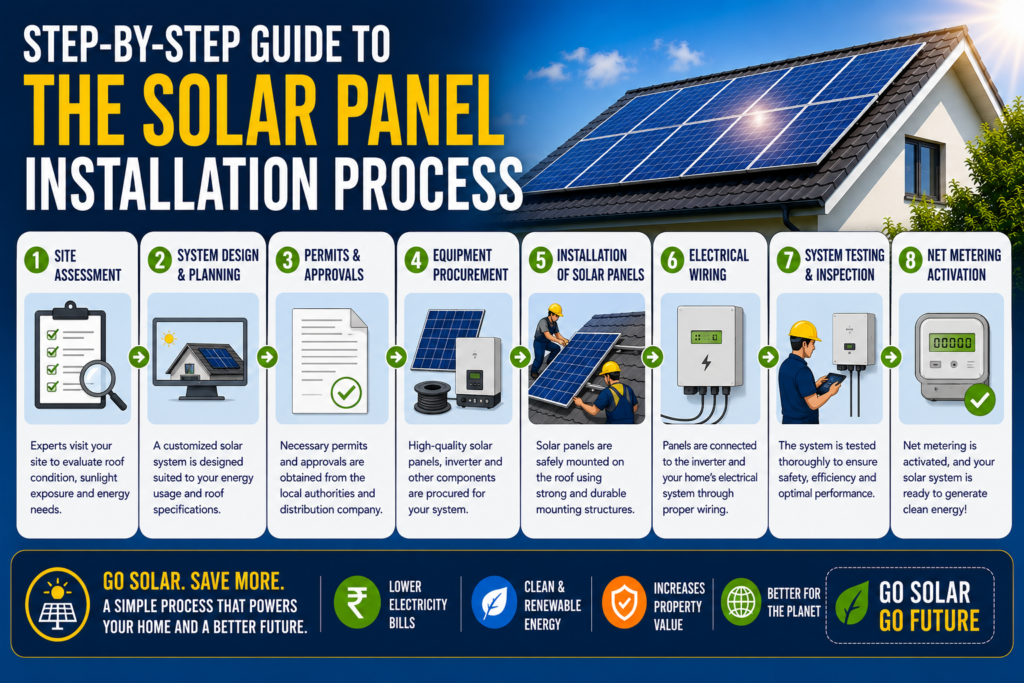
The demand for solar energy has grown rapidly over the last decade as homeowners, businesses, and industries seek cleaner, more affordable, and sustainable energy solutions. Rising electricity costs, government incentives, and growing environmental awareness have encouraged millions of people to switch to solar power.
Installing a solar power system is one of the smartest long-term investments you can make. A professionally installed solar system can significantly reduce your monthly electricity bills, increase your property’s value, and minimize your carbon footprint. Modern solar panels are highly efficient, require minimal maintenance, and typically last 25 to 30 years.
However, many people are unsure about what actually happens during a solar panel installation. Questions such as “How long does installation take?”, “What inspections are required?”, and “What are the different installation stages?” are common among first-time buyers.
Understanding the installation process helps you make informed decisions, avoid common mistakes, and choose the right solar installation company. Whether you’re planning a residential rooftop solar system or a commercial solar project, knowing each step ensures a smooth experience from consultation to commissioning.
In this comprehensive guide, we’ll walk you through the complete solar panel installation process, explaining every stage in detail.
1. Site Assessment and Energy Consumption Analysis
The first and one of the most important stages of solar panel installation is conducting a detailed site assessment. Before recommending a solar system, professionals evaluate your property’s location, roof condition, electricity usage, and shading.
During the site visit, solar experts examine:
Roof size and available installation space
Roof orientation and tilt angle
Structural strength of the roof
Shade caused by nearby buildings or trees
Existing electrical infrastructure
Monthly electricity consumption
They also analyze your previous electricity bills to estimate your average power usage. This helps determine the ideal solar system capacity required to meet your energy needs.
For example:
1–2 BHK homes may require 2–3 kW.
Medium-sized homes often require 3–5 kW.
Large villas may require 5–10 kW.
Commercial buildings may require 20 kW to several megawatts.
A proper site assessment ensures maximum energy generation and avoids future performance issues.
2. Designing the Solar Power System
Once the site inspection is complete, engineers design a customized solar system tailored to your property’s requirements.
The design process includes:
Determining the number of solar panels
Selecting the appropriate inverter
Planning cable routing
Designing mounting structures
Identifying the safest installation locations
Calculating expected annual electricity generation
Using specialized solar design software, engineers simulate sunlight exposure throughout the year to optimize panel placement.
The design also considers:
Future expansion possibilities
Battery backup integration (if required)
Grid connectivity
Safety regulations
Maintenance accessibility
A well-designed solar system maximizes efficiency and ensures optimal return on investment.
3. Selecting High-Quality Solar Components
The performance and lifespan of your solar system largely depend on the quality of its components.
The major components include:
Solar Panels
Modern solar panels are available in:
Monocrystalline Panels
Polycrystalline Panels
Bifacial Solar Panels
TOPCon Solar Panels
Mono PERC Panels
Monocrystalline and TOPCon panels are generally preferred due to their higher efficiency.
Solar Inverter
The inverter converts DC electricity generated by solar panels into AC electricity used by household appliances.
Popular inverter options include:
String Inverter
Micro Inverter
Hybrid Inverter
Central Inverter
Mounting Structure
The mounting structure secures the panels to the roof and must withstand heavy wind, rain, and harsh weather conditions.
Common materials include:
Hot-dip galvanized steel
Aluminum structures
Balance of System (BOS)
Other essential components include:
DC cables
AC cables
Junction boxes
Earthing kits
Lightning arrestors
DCDB & ACDB
MC4 connectors
Monitoring systems
Choosing premium-quality components ensures long-term performance and minimizes maintenance costs.
4. Government Approvals, Documentation, and Subsidy Process
Before installation begins, several approvals and documents may be required depending on your state and electricity distribution company.
Typical documentation includes:
Identity proof
Address proof
Electricity bill
Property ownership documents
Roof ownership consent (if applicable)
If you’re eligible for government subsidies, your installer will assist with the application process.
The approval stage generally includes:
Net metering application
DISCOM approval
Structural safety compliance
Electrical safety documentation
Government subsidy registration
Professional solar companies handle most of this paperwork, making the process hassle-free for customers.
Obtaining all approvals before installation ensures legal compliance and smooth grid connectivity.
5. Installation of Mounting Structure and Solar Panels
Once approvals are completed, the actual installation begins.
The mounting structure is installed first because it forms the foundation of the solar system.
Installation steps include:
Marking panel positions
Installing anchor bolts
Fixing aluminum or galvanized structures
Ensuring proper tilt angle
Tightening all structural connections
After the structure is ready, technicians carefully install the solar panels.
Important considerations include:
Proper spacing between panels
Secure fastening
Correct orientation
Cable management
Waterproof sealing
Professional installers use safety equipment throughout the installation to ensure worker safety and prevent roof damage.
Most residential systems are installed within one to three days, depending on system size.
6. Electrical Wiring, Inverter Installation, and System Integration
After mounting the panels, electrical connections are completed.
Solar panels generate direct current (DC), which travels through specially designed cables to the inverter.
Installation involves:
DC cable routing
AC wiring
Earthing installation
Lightning protection
Inverter mounting
ACDB installation
DCDB installation
Circuit breaker installation
The inverter is usually installed in a shaded, well-ventilated location to maintain optimal performance.
Modern solar systems also include Wi-Fi monitoring, allowing users to monitor:
Daily electricity generation
Monthly production
Lifetime energy output
Carbon emission savings
System efficiency
Fault notifications
Proper electrical installation is essential for safety, efficiency, and long-term reliability.
7. Testing, Inspection, and Grid Connection
Once installation is complete, the system undergoes thorough testing before being commissioned.
Engineers inspect every component, including:
Panel connections
Wiring quality
Voltage output
Inverter operation
Earthing resistance
Safety devices
Mounting stability
After internal testing, the local electricity authority may conduct an inspection before approving the system for grid connection.
Once approved:
Net meter is installed
Grid synchronization is completed
System is energized
Performance testing begins
At this stage, your solar panels begin generating electricity for your home or business.
Any excess electricity can be exported back to the grid through net metering, helping reduce electricity bills even further.
8. Maintenance, Monitoring, and Long-Term Performance
Although solar systems require very little maintenance, regular inspections help maintain peak performance.
Recommended maintenance includes:
Cleaning panels every 2–4 weeks (depending on dust levels)
Checking electrical connections
Inspecting mounting structures
Monitoring inverter performance
Reviewing electricity generation reports
Removing leaves or debris
Annual professional inspections
Signs that maintenance may be needed include:
Sudden drop in power generation
Inverter warning messages
Physical damage to panels
Loose wiring
Water leakage near electrical components
Most solar panels come with:
25–30 years performance warranty
10–15 years product warranty (varies by manufacturer)
5–10 years inverter warranty (extendable)
With proper maintenance, a high-quality solar system can continue generating clean electricity efficiently for decades.
Conclusion
Installing a solar panel system is more than just placing panels on a rooftop—it’s a carefully planned process involving site evaluation, customized system design, quality component selection, regulatory approvals, professional installation, electrical integration, thorough testing, and ongoing maintenance.
Each stage plays a vital role in ensuring your solar system operates safely, efficiently, and delivers maximum savings over its lifespan. Choosing an experienced and trusted solar installation company can make the entire process seamless while helping you avoid costly mistakes.
Whether you’re a homeowner looking to reduce electricity bills or a business aiming to lower operational costs and embrace renewable energy, investing in solar power is a smart decision with long-term financial and environmental benefits. With proper planning and professional installation, your solar system can provide reliable, clean energy for 25 years or more.
If you’re considering switching to solar, now is the perfect time to take the first step toward energy independence and a more sustainable future. Consult a reputable solar installer, assess your energy needs, and begin your journey toward cleaner, greener, and more affordable electricity.